
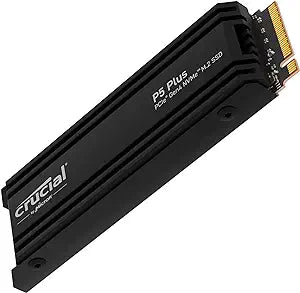
How to Install an NVMe SSD — Gen3 and Gen4 M.2 Guide
Installing an M.2 NVMe SSD is one of the cleanest hardware upgrades available for a desktop or laptop: no cables, a single retention screw, and the entire process takes under 20 minutes. The key preparation step is confirming the target M.2 slot's PCIe generation and key type before purchasing a drive. According to Tom's Hardware's SSD benchmark coverage, for general-purpose workloads (OS boot, application launches, file browsing) the practical improvement from any NVMe drive over a SATA SSD or HDD is substantial — and the Gen3 vs. Gen4 difference matters most in sustained sequential workloads like video editing or large file transfers, not everyday use.
Before You Begin: Slot Verification
Confirm three things from the motherboard manual before purchasing: (1) the slot supports M-key NVMe (not SATA-only M.2), (2) the PCIe generation the slot is wired to (Gen3 or Gen4 — primary slots on Intel 12th Gen+ and AMD Ryzen 5000+ support Gen4; secondary slots are often Gen3 through the chipset), and (3) whether the slot shares lanes with SATA ports that will be disabled when the M.2 slot is occupied. A Gen4 drive installed in a Gen3 slot operates at Gen3 speeds — no hardware harm, but not the rated peak performance.
Safety
Shut down fully, disconnect power (flip the PSU rocker switch on desktops), and discharge static by touching the bare metal chassis interior before handling the drive. On laptops, unplug the AC adapter and, for non-removable batteries, hold the power button five seconds after disconnecting. If the board has a built-in M.2 heatsink with a pre-applied thermal pad, peel the backing film from the pad before reinstalling the heatsink — a common oversight that leaves the drive thermally insulated by a plastic film.
Tools Needed
- Phillips #0 or #1 screwdriver (for M.2 retention screw and desktop side panel)
- M.2 retention screw + standoff (typically pre-installed; M2×3mm if missing)
- Thermal pad (if board heatsink pad is damaged; usually comes pre-applied)
Quick Installation Summary
- Shut down, disconnect power, discharge static by touching the chassis interior.
- Remove any M.2 slot heatsink/shroud (typically 2–3 Phillips screws); peel thermal pad backing film if present.
- Remove the M.2 retention screw (and standoff if needed); confirm the standoff is at the 80mm (2280) position for standard drives.
- Hold the NVMe module at ~30 degrees; align the M-key notch with the slot's key ridge; slide the gold contacts fully in.
- Press the free end of the drive flat toward the motherboard — the drive lies at 0 degrees when correctly seated.
- Insert the retention screw and tighten finger-tight plus a quarter-turn. Do not overtighten.
- If using a board-integrated heatsink, lower it onto the drive (thermal pad contact side down) and reinstall the heatsink screws.
- Reassemble, reconnect power, and boot to BIOS to confirm the drive appears in the storage/boot device list.
- If it's a new secondary drive, initialize and format it in Disk Management (Windows) or Disk Utility (macOS) after booting to the OS.
Gen3 vs. Gen4: What Changes in Practice
PCIe Gen4 drives offer 2–2.5× higher peak sequential bandwidth than Gen3. AnandTech's Crucial P3 review and Samsung 970 EVO Plus review both document that random-access latency — which governs OS and application responsiveness — is broadly similar between Gen3 and Gen4 mid-range drives. The real-world gap widens with large sequential writes (4K+ video editing, game installs from local storage), narrows to near-zero for web browsing and productivity applications. A Gen4 drive in a Gen3 slot performs identically to a Gen3 drive in that slot; the extra headroom only matters when the slot itself is Gen4.
Troubleshooting in Brief
- Drive not detected in BIOS: Reseat; check slot PCIe/SATA mode setting in BIOS (must be set to NVMe or Auto-NVMe); confirm slot-sharing with SATA is not disabling NVMe mode.
- Drive detected at Gen3 speeds instead of Gen4: Check BIOS for slot PCIe gen setting; confirm the CPU supports Gen4 (Intel 11th Gen and earlier do not on consumer platforms).
- Thermal throttling under load: Add or verify heatsink; Gen4 drives need thermal management for sustained write workloads.
- Secondary slot slower than primary: Expected — secondary M.2 slots on most boards run through the chipset at Gen3, not direct CPU lanes at Gen4.
The full step-by-step guide with M-key vs. B-key identification, thermal pad handling, lane-sharing behavior, and extended troubleshooting is at studio-supplies.com/blogs/guides/nvme-ssd-install-gen3-gen4-guide.
Sources & Citations
- Crucial, "SSD Support Articles & FAQs," crucial.com (accessed 2026-05-31)
- Tom's Hardware, "Best SSDs for 2026," tomshardware.com (accessed 2026-05-31)
- AnandTech, "The Crucial P3 Review," anandtech.com (accessed 2026-05-31)
- AnandTech, "Samsung 970 EVO Plus SSD Review," anandtech.com (accessed 2026-05-31)
- Samsung, "Consumer Storage Support," semiconductor.samsung.com (accessed 2026-05-31)
Last verified: 2026-05-31


