Western Digital

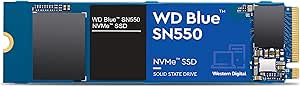
Western Digital WDS250G2B0C 250GB WD Blue NVMe SSD

Experience Lightning-Fast NVMe PerformanceThe Western Digital 250GB WD Blue SN550 NVMe Internal SSD provides ultra-responsive performance for your PC. With speeds up to 2,400 MB/s, this SSD ensures lightning-fast data access and enhanced productivity.Specifications: Capacity: 250GB Form Factor: ...

Search on Amazon
Affiliate Disclosure: Studio Supplies may earn a commission from qualifying purchases made through links on this page, at no additional cost to you. This helps support our editorial team.

Notice a mistake? Let Us Know

Overview

Experience Lightning-Fast NVMe Performance

The Western Digital 250GB WD Blue SN550 NVMe Internal SSD provides ultra-responsive performance for your PC. With speeds up to 2,400 MB/s, this SSD ensures lightning-fast data access and enhanced productivity.

Specifications:

  • Capacity: 250GB
  • Form Factor: M.2 2280
  • Interface: Gen3 x4 PCIe 8Gb/s
  • NAND: 3D NAND
  • Sequential Read Speed: Up to 2,400 MB/s

Crucial MX500 SATA SSD (500GB / 1TB / 2TB) — Editorial Review & Use Cases

The Crucial MX500 family (CT500MX500SSD1, CT1000MX500SSD1, CT2000MX500SSD1, plus the M.2 SATA variants CT1000MX500SSD4) is Crucial's mainstream-pro SATA III SSD line — TLC NAND with DRAM cache, ~560 MB/s sequential read / 510 MB/s sequential write, 5-year warranty / 360TBW endurance (1TB model), AES-256 hardware encryption, and Power Loss Immunity protection. Per Crucial's official MX500 product page, the MX500 has been a 5+ year staple for SATA-port system upgrades, sitting one tier above the entry-level BX500 (QLC NAND, no DRAM) and below NVMe-class options.

What the MX500 Specifically Wins Over BX500

  • TLC NAND (vs BX500's QLC NAND) — TLC has 3x the endurance of QLC at the same density. Real-world: MX500 handles 360TBW (terabytes written) endurance on the 1TB model vs BX500's 240TBW. Translates to longer reliable life under sustained write workloads
  • DRAM cache (vs BX500's DRAM-less design) — sustained random write performance is markedly better. For databases, VMs, video edit scratch, the DRAM cache prevents the "cliff" where sustained writes drop to QLC-direct speeds (~80-100 MB/s vs MX500's sustained 500+ MB/s)
  • AES-256 hardware encryption — supports OPAL 2.0 / TCG hardware encryption for secure-erase + drive-level encryption. BitLocker / FileVault leverage it for hardware-accelerated encryption
  • Power Loss Immunity (PLI) — onboard capacitors flush in-flight writes to NAND on power loss. Reduces risk of file system corruption on unexpected shutdowns. Critical for desktop / workstation use
  • 5-year warranty + Crucial / Micron parent reliability
  • Solid SATA III interface compatibility — works with any SATA port (desktop motherboard, laptop SATA, USB-SATA enclosure) without TRIM / driver issues
  • M.2 SATA variant (CT*MX500SSD4) — for M.2 SATA slots (not NVMe!) — verify motherboard slot supports SATA M.2 before purchasing this variant

Where the MX500 Specifically Fits

  • SATA-port system upgrades — older motherboards / SATA-only systems where NVMe isn't an option
  • Boot drive on older PCs — replaces HDD with SSD for dramatic boot + app responsiveness improvements
  • Secondary game / media drive in newer PCs with NVMe primary + SATA secondary
  • Mac / Linux servers + NAS arrays — TLC + DRAM + 5-year warranty + PLI is the appropriate reliability tier
  • Workstation scratch drive — Photoshop / Premiere / DaVinci Resolve scratch + cache without NVMe overhead
  • Database / VM hosting — sustained write performance + endurance suit small-to-medium DB workloads
  • External USB-SATA enclosure use — portable SSD with SATA III speeds (~560 MB/s) via USB 3 enclosure
  • Older laptop SATA upgrade — replaces 2.5" HDD with SSD for substantial battery life + responsiveness gain
  • Surveillance / DVR storage — DRAM + TLC handles continuous-write workloads
  • Linux servers requiring TRIM-aware SSDs — fully supported via fstrim

Honest Limits Buyers Should Know

  • SATA III caps at 560 MB/s — NVMe is 6-12x faster. For workflows where SSD speed matters (large file editing, AAA game loading, video edit timeline scrubbing), NVMe (Crucial P3, WD Black SN850, Samsung 990 PRO) is dramatically faster. SATA SSD is the "adequate for most users" tier
  • Sustained writes can throttle on prolonged workloads. When the DRAM cache fills, sustained writes drop to ~200-300 MB/s direct-to-NAND. Multi-hour sustained workloads see this throttling; bursts of write activity don't
  • NOT for M.2 NVMe slots. The M.2 SATA variant (CT*MX500SSD4) only fits M.2 SATA slots (B-key or B+M-key with SATA support). Modern motherboards typically have M.2 NVMe slots (PCIe / M-key). Verify slot type before buying M.2 SATA — installing M.2 SATA in M.2 NVMe slot does NOT work
  • 2.5" form factor — needs SATA cable + SATA power. Desktop install needs an open SATA port + SATA power from PSU. Verify available before assuming installation works
  • 4K random IOPS lag behind NVMe. NVMe Gen3 SSDs deliver ~600K IOPS at 4K QD32; MX500 delivers ~95K. For database / VM hosting workloads, this matters; for everyday use, it doesn't
  • 3-bit TLC has slightly worse endurance than 2-bit MLC. Premium-tier SSDs (Samsung 970 PRO, Intel Optane) used MLC for higher endurance. MX500's TLC is mainstream-grade; not for write-heavy enterprise workloads
  • SLC cache size limits. The pseudo-SLC cache (used for fast writes) is 6-9% of total capacity. After exhausting it, writes drop to TLC-direct speeds
  • USB-SATA enclosure throughput depends on enclosure quality. Cheap UASP-disabled enclosures cap at 200-300 MB/s; quality ASMedia 2362-based enclosures hit the SATA III ceiling

Where Buyers Should Look Elsewhere

  • NVMe-class speeds → Crucial P3 / P3 Plus, WD Black SN770 / SN850X, Samsung 970 EVO Plus / 990 PRO
  • Budget SATA SSD (acceptable speed loss) → Crucial BX500 (QLC, DRAM-less, lower endurance)
  • Enterprise / 24/7 write-heavy → Crucial Pro / Samsung 870 PRO (MLC) / Intel Datacenter SSDs
  • External portable SSD (USB-C) → SanDisk Extreme Portable / Samsung T7 / WD My Passport SSD
  • Premium SATA with longer warranty → Samsung 870 EVO (5 yr, similar specs, slightly higher price)
  • Higher capacity (4TB / 8TB SATA SSD) → Samsung 870 QVO (QLC), Crucial MX500 4TB

Sources & Citations

  1. Crucial, "MX500 SATA SSD product family page," crucial.com (accessed 2026-05-18)
  2. Tom's Hardware, "SATA SSD comparison and benchmarks," tomshardware.com (accessed 2026-05-18)
  3. AnandTech, "Crucial MX500 review and TLC SSD coverage," anandtech.com (accessed 2026-05-18)
  4. Backblaze, "SSD reliability + endurance studies," backblaze.com (accessed 2026-05-18)

Last verified: 2026-05-18

How to Install an NVMe SSD — Gen3 and Gen4 M.2 Guide

Installing an M.2 NVMe SSD is one of the cleanest hardware upgrades available for a desktop or laptop: no cables, a single retention screw, and the entire process takes under 20 minutes. The key preparation step is confirming the target M.2 slot's PCIe generation and key type before purchasing a drive. According to Tom's Hardware's SSD benchmark coverage, for general-purpose workloads (OS boot, application launches, file browsing) the practical improvement from any NVMe drive over a SATA SSD or HDD is substantial — and the Gen3 vs. Gen4 difference matters most in sustained sequential workloads like video editing or large file transfers, not everyday use.

Before You Begin: Slot Verification

Confirm three things from the motherboard manual before purchasing: (1) the slot supports M-key NVMe (not SATA-only M.2), (2) the PCIe generation the slot is wired to (Gen3 or Gen4 — primary slots on Intel 12th Gen+ and AMD Ryzen 5000+ support Gen4; secondary slots are often Gen3 through the chipset), and (3) whether the slot shares lanes with SATA ports that will be disabled when the M.2 slot is occupied. A Gen4 drive installed in a Gen3 slot operates at Gen3 speeds — no hardware harm, but not the rated peak performance.

Safety

Shut down fully, disconnect power (flip the PSU rocker switch on desktops), and discharge static by touching the bare metal chassis interior before handling the drive. On laptops, unplug the AC adapter and, for non-removable batteries, hold the power button five seconds after disconnecting. If the board has a built-in M.2 heatsink with a pre-applied thermal pad, peel the backing film from the pad before reinstalling the heatsink — a common oversight that leaves the drive thermally insulated by a plastic film.

Tools Needed

  • Phillips #0 or #1 screwdriver (for M.2 retention screw and desktop side panel)
  • M.2 retention screw + standoff (typically pre-installed; M2×3mm if missing)
  • Thermal pad (if board heatsink pad is damaged; usually comes pre-applied)

Quick Installation Summary

  1. Shut down, disconnect power, discharge static by touching the chassis interior.
  2. Remove any M.2 slot heatsink/shroud (typically 2–3 Phillips screws); peel thermal pad backing film if present.
  3. Remove the M.2 retention screw (and standoff if needed); confirm the standoff is at the 80mm (2280) position for standard drives.
  4. Hold the NVMe module at ~30 degrees; align the M-key notch with the slot's key ridge; slide the gold contacts fully in.
  5. Press the free end of the drive flat toward the motherboard — the drive lies at 0 degrees when correctly seated.
  6. Insert the retention screw and tighten finger-tight plus a quarter-turn. Do not overtighten.
  7. If using a board-integrated heatsink, lower it onto the drive (thermal pad contact side down) and reinstall the heatsink screws.
  8. Reassemble, reconnect power, and boot to BIOS to confirm the drive appears in the storage/boot device list.
  9. If it's a new secondary drive, initialize and format it in Disk Management (Windows) or Disk Utility (macOS) after booting to the OS.

Gen3 vs. Gen4: What Changes in Practice

PCIe Gen4 drives offer 2–2.5× higher peak sequential bandwidth than Gen3. AnandTech's Crucial P3 review and Samsung 970 EVO Plus review both document that random-access latency — which governs OS and application responsiveness — is broadly similar between Gen3 and Gen4 mid-range drives. The real-world gap widens with large sequential writes (4K+ video editing, game installs from local storage), narrows to near-zero for web browsing and productivity applications. A Gen4 drive in a Gen3 slot performs identically to a Gen3 drive in that slot; the extra headroom only matters when the slot itself is Gen4.

Troubleshooting in Brief

  • Drive not detected in BIOS: Reseat; check slot PCIe/SATA mode setting in BIOS (must be set to NVMe or Auto-NVMe); confirm slot-sharing with SATA is not disabling NVMe mode.
  • Drive detected at Gen3 speeds instead of Gen4: Check BIOS for slot PCIe gen setting; confirm the CPU supports Gen4 (Intel 11th Gen and earlier do not on consumer platforms).
  • Thermal throttling under load: Add or verify heatsink; Gen4 drives need thermal management for sustained write workloads.
  • Secondary slot slower than primary: Expected — secondary M.2 slots on most boards run through the chipset at Gen3, not direct CPU lanes at Gen4.

The full step-by-step guide with M-key vs. B-key identification, thermal pad handling, lane-sharing behavior, and extended troubleshooting is at studio-supplies.com/blogs/guides/nvme-ssd-install-gen3-gen4-guide.

Sources & Citations

  1. Crucial, "SSD Support Articles & FAQs," crucial.com (accessed 2026-05-31)
  2. Tom's Hardware, "Best SSDs for 2026," tomshardware.com (accessed 2026-05-31)
  3. AnandTech, "The Crucial P3 Review," anandtech.com (accessed 2026-05-31)
  4. AnandTech, "Samsung 970 EVO Plus SSD Review," anandtech.com (accessed 2026-05-31)
  5. Samsung, "Consumer Storage Support," semiconductor.samsung.com (accessed 2026-05-31)

Last verified: 2026-05-31

Now that you've seen the details — ready to take a closer look?

Search on Amazon